Showing posts with label mixed media. Show all posts

Thursday, February 28, 2013

Art Journal Page: Cave Painting

This page is called Cave Painting because that's what it reminds me of and I couldn't really think of anything else to call it. I welcome suggestions. It features my dog, Annabelle Dangermouse, who is a very spoiled, almost eight years old rat terrier.


I started this page by ripping a brown paper bag into squares, which I then crumpled into balls. I sprayed them with water and let them dry crumpled up. I'm not sure why I wet them. I may have read it on a blog or seen it in a tutorial video, but I really don't remember. It just seemed like a good idea at the time. The next day when I went to flatten them, the paper was very crispy. That's not really the word I mean, but it's close enough. I tried to flatten them a bit, by rubbing them on the edge of my desk like you do a dollar bill that won't go into a vending machine, but I didn't try real hard. I wanted to keep the texture.

I glued the squares onto my page, and using a make up sponge, I spread some gesso, mostly on the high spots, but on some of the lower spots too.


At this point, I thought it might look kinda cool with a silhouette in black.  My dog has very distinctive ears, so I thought I'd use her. There was a lot of empty space due to the width of her ears, so using q-tips, I painted some dots in various colors around the edges.


While I liked the dots, the silhouette looked funky, and not in a good way. I think the problem was that the picture I used as a guide for her head shape was taken from above instead of straight on. To make it look less like an alien, I painted her white stripe. Is it still called a blaze if it's not on a horse? Anyway, I like it much better now.

For comparison, although this is not the picture I used as a guide. There aren't very many pictures of Annabelle with her ears up because if she sees the camera, she runs or looks away.

Friday, February 22, 2013

Art Journal page: Limited Edition

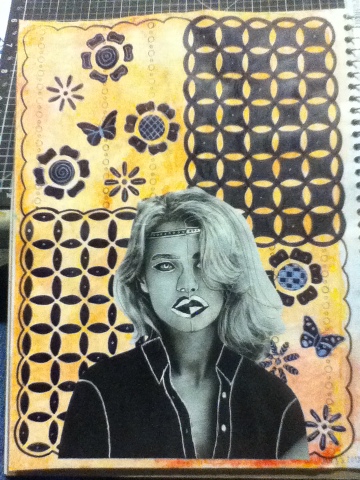
Here is my most recent art journal page. To do the background, I used masking tape to make a grid and used several colors of spray inks. The tape I used was cheapy stuff from the dollar store and it didn't stick down very well, but I rather like the look where the ink seeped under the tape. I drew in the grid lines with a black marker. The girl was drawn on a book page, painted with acrylic paint and outlined with Glaze pens. She was cut out, glued down, and outlined with black gelato. There's also some washi tape at the bottom, mostly because she looked weird without something to ground her. The words say "You are a perfect limited edition." The blobs around the words started out as circles with little asterisks or maybe flowers in them, but when I was smearing the gelato around them, they turned into blobs, probably due to the cheap cardstock they were printed on. I may go back and try to cover them or somehow fix it. Right now, I can't think of anything to do that isn't likely to make it worse. Oh well, I still like the page overall, and I'm rather proud of the girl. Faces really aren't my strong suit and I've been practicing a lot this year trying to improve. I'm especially proud of her nose. You can actually tell it's a nose! And I did it without erasing 500 times.


The background- I almost left it as it was because I liked it so much.

I think I may have mentioned in an earlier post that I find this art journal a bit intimidating. The pages are twice the size of the journal I used last year and somehow I feel like each page has to be pretty and complete before I move on to the next page. In last year's journal, I did a lot more experimenting, mostly because I has no idea what I was doing. I intend to keep working in this journal, but I decided that I needed another outlet. So I made an art journal from scratch. It's tiny- only about 4 1/2 by 3. The cover was made from a box of those little packets of flavoring for bottled water and the pages are all from my scrapbook paper scraps.

I absolutely love this journal. I've been doodling in it and glued in some book page scraps that were too small to keep. I haven't started painting in it, but when I do, I don't plan to worry too much about messing up other pages. I just wanted a place where I could go wild. So I made me one! It doesn't really look like much and I probably put too much paper in it- I'm using a rubber band to keep it shut and I've barely started working in it, but I really just love it!


Thursday, January 31, 2013

Art Journal page: Eiffel Tower

I don't really feel like this page is finished. If I had something to write, I'd probably lightly gesso out a square or rectangle on the right to write it on. But I'm drawing a blank. I mean- I could come up with something, but it wouldn't be me, if you know what I mean. Oh well. I guess I'll leave it unless I come up with something else. 

I don't have any in-progress shots this time, but it's a fairly simple page. The blue is Dylusions Spray Ink, let to dry partially and then spread out with a sponge. I tried to do the same with the green, but I couldn't get it to work in the same way, so the green is acrylic paint, thinned with water and applied with a sponge that I had cut spiky grass shaped in, to give it a streaky look. I cut a cloud shape stencil out of cardstock and used a wet paper towel to remove the blue ink from the cloud shapes. The heart is a piece of cardstock covered with strips of book paper and colored with glimmer mist. The butterfly is a sticker. And the tower is from a stencil. I traced it on a piece of cardstock and then joined up all the bits that were separated because it's a stencil. I cut it out, mostly using a craft knife. It's painted with two different colors of gray and then lightly sprayed with some Smootch Spritz in a silver color. Once it was glued down, I gave it a bit of a shadow with a black gelato and some highlights with a white gelato and used a damp q-tip to soften and blend in the gelato. I think that's everything.

I've taken quite a few pictures to show how it really looks, but my light is horrible and it's already dark out. Maybe I'll try again in the morning. Until then, here are a few of the better photos I was able to get.


Close-up to show texture
Edited to add new photo below. It's not much better, but the colors are a bit more true to how they actually look.

Thursday, January 24, 2013

Art Journal page: Just Be You

I'm not sure I care for the size of my new art journal. It's 8 1/2 x 11. My last one was half that size and seemed less intimidating. It's also taking me a week to complete a page, but that probably has more to do with not being very inspired lately. I've also been spending a lot more time watching tutorial videos and looking at pictures of other people's work. I've been looking for inspiration, but mostly end up wishing I knew what I was doing.

Anyway, here's this weeks page! The writing says: By your own soul learn to live/ and if some thwart you take no heed/ if some hate you have no care/ sing your song/ dream your dream/ hope your hope/ and pray your prayer - Pakenham Beatty. I came across that poem? quote?- whatever it is, this week. I had already been thinking along the lines of "be yourself", so it really stuck with me, especially since it basically means "forget the haters; just do your own thing."


This is how it started. I had used the under-journaling technique I talked about here and this is how it came out.


I didn't like it, so I played around with it some more and finally decided just to cover it. I used a bunch of random scraps- the only thing they had in common was that they all had at least some blue.


I used a light coat of gesso over top, but wiped it off a bit in some places to let the paper show through.


Then I used a technique I saw on Pinterest. The original page is here. Basically, instead of using modeling paste through a stencil, you use a glue stick. My stencil, however had dried paint on it and the glue picked up the color, which is where the red came from. I also did it with a clean stencil, but it's not really visible in the photo. I was originally intending to stick to shades of blue, but I kind of like how the red looked and decided to go with it.


Next I used sequin waste/ punchinella with some acrylic paint. I also put a few drops of spray ink at the top of the page, spritzed it with water, and tilted the book up to make it run.


I don't have any more in progress pictures, even though I did a lot of little things here and there. I'll try to remember everything. With a very thin coat of gesso, I made a place for the poem I found and wrote that in. The Just Be You was done with a Sharpie and I traced just inside the letters with white gel pen. I added the girl- she's from a catalog- and traced around her with a white gel pen. She didn't stand out very well, so I gave her a shadow. I used a black Faber-Castell gelato. First time using it, so I had no clue what I was doing, but I just played around with it until I was happy with how it looked. I also used it around the poem and around the edge of the page to give it a more defined look.

Here's the finished piece again:


 I wasn't real sure about this page at first, but the more I look at it, the more I like it!

Wednesday, January 16, 2013

Art Journal page: Doodle

This is the second completed page in my new art journal. I really like how it turned out. Please excuse the awful picture. It's been raining forever and the light is horrid. In person, the background is much less washed out.


I did the background with an under-journaling technique that I first saw here. I changed it up a bit. I used watercolor crayons to journal, and when I was done, I went over it with a wet brush to obscure the writing and make my background. I used several different colors: pink, yellow, orange, and red. I really like under-journaling because I have a hard time writing anything that other people might see.

I found the girl in a magazine and doodled on her with a black pen and a white gel pen. The rest of the page was done with a couple of stencils and Sharpie-type markers and doodling with white gel pen.


The background before adding the doodling.

Monday, January 7, 2013

Art Journal page: Fly

I don't normally post my art journal pages individually, but I really like the one I finished today and wanted to share it.


I took a few in-progress shots, and I'll briefly explain what I did. I started with a gessoed page and glued down some random paper scraps. Over this I sprayed some Dylusions spray ink over a stencil as well as a piece of paper with some large circles punched out.


Later, I sprayed some water on the ink and with a very inexpensive paintbrush (it's actually for house painting) I took a small amount of gesso and lightly painted over the page from top to bottom, intentionally smearing the colors.


Then I just added the rest. The large butterfly was made with my Cuttlebug. After it was embossed, I colored the embossed part with a silver Sharpie. The medium butterflies are from a punch. I think it's a Martha Stewart punch, but I don't own it, so I'm not sure. They were given to me several years ago. The tiny butterflies are from a small punch that I've had for years that I think came from the Dollar Tree. The letters are scrapbooking stickers that I've had for years; I'm not sure what company they're from. The flower stems and leaves are from two different Close to My Heart stamp sets. The flowers are made with several different punches, with the large circles punched from a paper where I had been playing around with a little kid watercolor set. There's also some random rub-on bits here and there. It's hard to tell from the picture, but I outlined most everything with a white gel pen.

I didn't really have much of a plan when I started, but I love how it turned out!


Tuesday, August 28, 2012

Altered Picture Frame

I had this picture frame that, while not horrible,  it just wasn't my style.


I was originally planning on still using it as a picture frame, so I gessoed it, thinking I would paint and/ or collage on it.


After thinking about it some more, I decided that I didn't want to keep the picture frame part and thought I would cover it with paper- or something, and decided to fill in the holes with dimensional magic. I've got this really old bottle- like 15 years old, and it's all yellowed, so I try to use it whenever I know it won't matter.


Next step: After adding another layer of gesso, I inked around the edges with tea dye distress ink.


I cut some cardstock slightly smaller than each panel,


covered it with dictionary paper,


and inked them with tea dye distress ink.


At this point, I still wasn't sure where I was going with this, but I figured I'd just keep going and eventually I'd get somewhere. I stamped four butterflies, cut them out, and accented them with a Gelly Roll clear stardust glitter pen.


I glued them on, but I knew it would need something else.


I had these paper flowers I made a few weeks ago and thought I'd try them.


The finished product! I think it turned out pretty good. It's definitely more my style now.